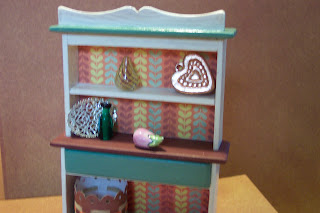
I've done a bit more work on the hutch that I started a while back. I know, I'm slow. It's almost done. I think that it needs bead feet but I can't decide if they should be brown or yellow.
What do you think?
The draw still needs handles, I have not found what I want yet. I did make the draw so that it can open, I forgot to get a picture of that.
Jaynie wanted a basket to sit beside it.
I bought this paper punch because I think that it makes a nice little fence. It also worked to make a simple basket out of very few supplies. I used thin strips of paper woven through and wooden shapes for the bottom. Glue, scissors and a toothpick to spread the glue were the only other supplies needed. It was easy to make it round, I'm going to try to make a rectangle one. I think it would work on the bottom shelf.
What kind of things would you put on it?


Your hutch is beautiful. I love the little baskets. Just an idea maybe a jug with flowers or and a decorative plate lol i am sure you will think of wonderful things to put on it.
ReplyDeleteHugs Maria
I love the hutch you made. I think brown beads underneath will go well with the brown center top. The punch you have is wonderful. You can make shorter rectangle baskets by just cutting the top. You could use the cut top pieces for making trays.
ReplyDeleteWhile you are working with card paper, you can make canisters and jugs, these will be very suitable for a hutch. I am sure Jaynie will love them. Marlies has a wonderful, very easy tutorial for paper jugs in her blog.
Hugs,
Marlies' blog, just in case, is http://marliesminies.blogspot.com/
ReplyDeleteYour hutch and basket are looking great. I would used brown beads and maybe you can fine smaller beads for handles.
ReplyDeleteMona
Thank you for the nice tutorial. I think you can put into the basket much balls of wool.
ReplyDeleteHugs from Craftland
Thank you for joining my giveaway.
That's a great way to make baskets. Very cute! =)
ReplyDelete